Friday, October 18, 2013

Chicken Rezala......sweet under note to a rich fragrant chicken curry.

I took a lot of pictures while I was making Chicken Rezala,so I decided to put them in a collage form to give an idea of all the things that happen to create this luxuriously delicious chicken dish that can be found in almost all restaurant menus in Kolkata.
Step 1
Marinate a pound of whole chicken cut into curry pieces in
2 tbsp of plain yogurt
1 tbsp of ground peppercorn
1 tbsp garlic paste
1 tbsp ginger paste
2 fresh green chilies chopped fine
Leave chicken to marinate for 20 mins.
Step 2
Boil to mid size onions or 1 big onion and make a paste of the boiled onions.
Step 3
Heat 1/4th cup ghee in a pan and add whole spices
1 Bay Leaf
2 cinnamon sticks
4-5 green cardamom
4-5 cloves
8-10 whole peppercorn
Step 4
Add the boiled onion paste to the pan when the whole spices emits a nice smell.....about 30 secs later.Cook onions for about 6-7 mins,onion will get a tinted pink color and the water will dry up.
Step 5
Add the marinated chicken and cook till chicken gets a little color and the water dries and masala emits a nice fragrance.
Step 6
Whisk 2 tbsp of sugar with 1 cup of thick yogurt.Add the sweetened yogurt to the chicken and stir
Step 7
Make a paste of soaked cashew. 1/2 cup whole cashew will become about 1/4th cup of paste and 2 tablespoons poppy seeds.Soaking the poppy seeds overnight will make a smoother paste.
Step 8
Add the cashew and poppy paste to the chicken and stir in.
Step 9
In a frying pan heat 1/4th cup of oil/ghee and lightly fry
1 cup onion rings
2 dry red chili
Step 10
Add the fried onion rings along with the oil and chili to the chicken.
Step 11
If needed add a cup of water and cover the chicken till the chicken is done and oil floats to the top.
Step 12
Add 2-3 drops of Kewra essence or rose water.

Chicken Rezala is ready to be served.


Friday, October 11, 2013

Kanch kolar kofta curry.......deep fried plantain balls in a curry.

This is again one of those special dishes that is made to compensate for the NO Non-Veg days in my house.I made this for a pot luck and it was very well received by everyone.The proportions make about 10-12 koftas.
For the Koftas
Plaintain-1 big or 2 small
Potaotes-1 medium sized
Garam masala-1 teaspoon
Green chilies-2 teaspoons(very finely sliced)
Red onions-2 tablespoons(finely chopped)
Green coriander-2 teaspoons(fine chopped)
Salt-to taste
Cornflour/All purpose flour-3 tablespoons
Oil-for frying the koftas


First cut the plantain into 2 inch pieces along with the skin, so that it can be boiled conveniently in the pressure cooker.Quarter your potatoes and boil them along with the plantain.It will take at the most 2 whistles for the plantains and potatoes to be soft for mashing up.Once they cool ,skin the potatoes and peel the plantains.Put the peeled and boiled plantains in a big bowl for mixing.Put in the skinned boiled potatoes and mash them together.Now add the garam masala,green chilies, onions,coriander and  salt. Mix well and divide equally into 10-12 portions to roll them to make balls.In a plate put the cornflour and roll the balls on the cornflour so that they are nicely coated all around.Now fry the koftas in batches in hot oil and keep aside to put them in a curry.
For the curry
Oil-4 tablespoons
Onions-1 small onion chopped up fine
Garlic-1 teaspoon grated/paste
Tomato-1 mid-sized chopped
Cumin powder-1 tablespoon
Red chili powder-1/2 teaspoon to 1 teaspoon
Garam masala-1 teaspoon
Sugar-1 teaspoon
Water -1 cup
Ghee-1 teaspoon
Salt to taste

Reduce the oil that you used for frying the koftas to about 4 tablespoons.The oil will have cornflour from the koftas and will give the gravy a nice consistency.In hot oil fry the onions till golden brown.Now add garlic and fry a couple of mins more.Add the tomatoes and put in some sugar and salt to help the tomatoes soften.Once tomatoes have melted down add the cumin powder and the chili powder.Fry till oil separates then add garam masala.Give the garam masala a min then add the water tomake the gravy.Let the gravy come to a boil.Now turn off the heat and add in the fried koftas. Add the ghee on top and cover the kofta curry for 10-15 mins.You can add more water for more gravy.
The kofta curry goes great with all kinds of Indian breads-rotis,parathas.You can serve it with plian rice or pilaf too.


Sunday, September 8, 2013

Super soft Idlis.......finally success!!!!

As kids, whenever I had to choose between between dosas or idlis,it would always be dosas for me.I simply could not relate to idlis,I found them extremely dry and I would end up gulping huge amounts of water to suppress the hiccups ready to surface any moment.Then finally I discovered softer idlis in Bangalore where it became my breakfast stable with 2 big bowls of sambar and chutney.My husband showed me how to eat ,sorry devour Idlis the South Indian way.To my dismay, I saw him break the Idlis into pieces on his plate and then empty his bowl of sambar followed by chutney on to the idlis. After such display of crudeness he took out his fork and spoon and spooned up the idli pieces with utmost refinement.Needless to say I followed suit and this is the way I enjoy my idlis.....tangy sambar and creamy coconut chutney on super moist idlis. 
I have made idlis quite a few times now trying out various permutations combinations suggestions to get that soft ....almost like a cloud idli. Bought the rice powder especially for making idlis,kept changing the rice and lentil proportions...but still the batter did not give soft idlis. Now I have hit on to the right recipe and am super excited.
This will make about 24 Idlis
Urad dal/White lentil-1 cup
Rice-2 cups
Cooked rice-1 cup
Fenugreek seeds-1 tabespoon
Salt-1 tablespoon

Soak the dal , rice and fenugreek seeds overnight in separate containers.Take a mixer/grinder and first grind the lentils.Add the soaked fenugreek seeds and grind it along with the lentils to  a smooth paste.Add just enough water so that the lentils grind smoothly between 1/4 to 1/2 a cup.
Take out the lentil paste and pour it into the bowl in which you would like your batter to ferment.
Now in your grinder add the soaked rice and the cooked rice and make it into a smooth paste.Pour the rice paste into the bowl in which you had previously put the lentil paste.Now add the tablespoon of salt to the batter.With clean hands mix the batter well,the rice and lentil paste should be well mixed.
Now you can cover the bowl and leave it to ferment....generally 8-12 hrs depending upon the atmospheric conditions.
I need some help from the oven because of the cold dry conditions here.After mixing the Idli batter with hand I put the bowl of batter into a 200 F pre-heated oven.You don't need to bake,once oven gets to 200 F you can switch off the oven.The batter will ferment and rise in the heat.You can repeat the oven process again if need be...idea is to create conditions conducive for batter to ferment.
Once the batter has risen you are good to make Idis.
Oil your Idli maker.Pour in the batter.Steam your Idlis for 12-15 mins in the pressure cooker without putting the weight.You Idlis are ready to be served with sambar and chutney.


Friday, August 30, 2013

Kancha peper beson diye tarkari.......Raw green papaya with gram flour sabzi

This "sabzi" is the reason I started eating raw papaya.It is not a bengali way of cooking,it's what a "marwari" friend of mine used to bring for lunch.This sabzi is super awesome...try it.
Raw papaya -2 cups (peeled,seeded and cubed)
Ghee-1 tablespoon
Asafotida-2 squirts
Cumin powder-1 teaspoon
Green chilies-2 chopped
Turmeric -1/2 teaspoon
Dry Mango powder/Amchur-1 teaspoon
Gram flour/Besan-1/2 cup
Oil-2 tablespoons
Salt-to taste

First pressure cook the raw papaya for 1 whistle with about 1/2 cup water. It should be just al dente,a little raw is fine but definitely not overcooked.Now on medium heat put a pan and add the ghee.Put 2 squirts of asafotida and the green chilies.Fry the green chilies for about 30 secs or so. Now add the boiled papayas.Add the turmeric and cumin powder and season with some salt.Now let the water in the papaya dry out a bit.Once the water has evaporated add the gram flour and let the gram flour cover the papaya pieces and let the gram flour roast and fry.Now add the 2 tablespoons of oil to help the frying of the gram flour.It will take about 4-5 mins.Now add the amchur powder and mix in well.Season according to your taste and serve hot with parathas or rotis. Delicious!!!
The snap is from my cell camera so it's not that great but this recipe is!!!Enjoy.

Sunday, July 21, 2013

Shukto.....slightly bitter medley of vegetables.

You cannot make "shukto" without the bitter gourd. Shukto is the "teto",the bitter needed to cleanse and prepare the palate for the rest of the delicious courses to follow.I used to hate "shukto" and all these "teto" palate cleansers as a kid.......which kid doesn't!!!I discovered my love for "shukto" and "neem begun" much much later ........when my mother had almost given up hope that I would ever be able to acquire a taste for them.
My mother in law makes wonderful shukto. She happens to be a "teto" lover and meals under her governance will always have some form of bitter ...thanks to the big neem tree in the garden......supply of bitter leaves is always an arm length away.
This is my mother in laws way of cooking "shukto" ....delicious, mildly bitter(for my sake) and very creamy.
The recipe requires "randhuni" but since we don't get "randhuni" here I have to make do with mustard seeds.
My mother-in-law fries all the vegetables like the plantain, eggplant, potatoes separately before putting it in the milk based gravy of the "shukto". I skip the separately frying,I put all the vegetables in the oil together and simmer on low heat till all veggies are soft.For my everyday cooking I prefer this low calorie version.

Vegetables:Usually potatoes,eggplant,ridge gourd,plantain and bitter gourd go into the making of shukto.
A cup of each vegetable sliced similar so that they take equal time to cook.
Randhuni/Mustard seeds-1 teaspoon
Bay leaf-1 big
Green chili-1 slit into 2
Turmeric powder-1/2 teaspoon
Sugar-1 teaspoon
Poppy seed paste-1 tablespoon
Mustard seed paste-1 tablespoon
Fresh ginger paste-1 tablespoon
Salt-to taste
Milk-1 cup
Ghee-1 tablespoon
Vegetable oil-4 tablespoons
Urad dal bori-8-10 (optional)

If you are going to add boris to your shukto,fry them in really hot oil till reddish brown and keep it aside.If the oil is not hot the boris will soak up all the oil.
Now in the remaining oil,add the randhuni/mustard seeds and the bay leaf.Let is splutter.Now add all the vegetables one by one.The plantains,the eggplant,the potatoes,the bitter gourd the ridge gourd...the order in which they take time to cook.Now add the turmeric,the sugar and some salt and cook the vegetables on low heat with a lid.The lid helps to retain the moisture of the vegetables while cooking...without the lid the veggies will become dry and you will have to add more water or more oil to continue the cooking without the veggies burning.
Once all the vegetables are soft add the mustard paste and the poppy seed paste.I, at times make "shukto" without the poppy seed paste and the mustard seed paste.........to make my life simpler.The "shukto" still tastes good.The mustard paste and the poppy paste add some richness and a tang to the "shukto".....added dimensions to the taste.In a couple of minutes the pastes will be cooked,now add the ginger and after a minute add the milk.Let the milk come to a boil add the fried boris and the ghee. Shukto is best served with plain white rice.


Friday, July 19, 2013

Kalai daaler bori...............sun dried lentil kisses.

The weather's been really hot for some time and I have been craving for "Shukto".But there is no fun in making "Shukto" if you don't have "kalai daaler bori".The Indian grocer here limits his bori varieties to the Punjabi masala vadi and the moong daal vadi. I was lucky to find cholar daaler bori also but never kalai daaler bori. I decided to take advantage of this heat wave and try something which I had seen my mother doing during our summer vacations........a balcony full of bori's drying in the hot sun.Well my mother also used to make potato chips and sabudana papads......lets save those for some other day.
I am a big fan of keeping things simple.....so this bori has just 4 ingredients
Urad daal/Kalai daal-1 cup (soaked 2-3 hrs)
Salt-1 teaspoon
Asefotida/Hing-2 squirts
Red chili powder-1/2 teaspoon
Grind the lentils after draining all the water in which the lentils were soaked.I had to add about 3 tablespoons more during the grinding process to make my grinder stop making the angry noises.It takes some time to grind it into a smooth paste....it'll get there with constant scraping of the sides...eventually.Once the lentil is a smooth paste you can take the paste out in a bowl in which you can easily whip some air into the paste, by hand.I took out the blade from my grinder bowl and whipped the air in my blender bowl itself.Add in the salt,chili and asefotida/hing at this stage and whip.Trust your hand to tell you when this whipping is done.Mine said done........ in 5 mins.

Now pipe it out on a baking tray with some oil spayed on the surface.I tried to make the" bori" shapes like Hershey's kisses with my hands but gave up after 3 tries.I then took out the biggest decorating tip that I had a Wilton 1M and piped it out in rows....much better.


I baked the "boris" first at 200 F pre-heated oven for an hour and then decided that it would be a shame not to take advantage of the outside sun.So for the next 3 days the boris dried in sun.If the weather had changed i would have continued the drying in the oven.
I fried 2 of the boris before packing them in an airtight container.....tasty crispy airy fluffy and that is when I decided it was a successful attempt which deserves a post.  

Tuesday, July 16, 2013

Carrot cake with cream cheese frosting and toasted pecans

It's such a classic cake.As soon as I saw it being made in one of the episodes of America's test Kitchen I knew I had to try my hands on this.I like to bake....it's my stress buster.I don't mind the BIG clean up that follows...the cake batter drops on the counter,frosting in the nooks of the whipper....nothing can spoil the joy of the cake rising and the smell of baking.
If I find a good cake recipe I wait for Daddy D's birthday to try it out....but this year I decided to "Lean In" :-) Inspired by Sheryl Sandberg's story of her mother who celebrated her 70th birthday by organizing her own Bar Mitzvah. She did not have one like her brothers when she was little, because it's traditionally an occasion for men.
Leaning in I baked a cake for myself on my birthday.....A first!!!The Joy of Baking to celebrate life.My Life....and I am not apologetic about it.

This is going to be a real fast post because the cake recipe and the process is very scientifically explained in the site of America's Test Kitchen.You just have to search for their carrot cake recipe.I would have loved to follow their frosting recipe too but it had Powdered buttermilk as one of the ingredients and I could not find this at my local grocers.So,I took the frosting recipe from Martha Stewart's baking site....It's yummy.
For toasting the pecans that go on the side of this cake,bake the pecans in a greased pan for 5 mins at 200 F pre heated oven.
This is what my cake looks like.I made a 2 layer cake.If you don't have an offset spatula for spreading the cake batter or the frosting, a "haata"( the big spoon with which rice is served) works fine.Use the backside of the "haata" for spreading.

Sunday, July 14, 2013

Chicken Bharta.....a kolkata dhaba speciality

There are some items which roadside eateries of Kolkata excel in making...chicken bharta is one of them.Chicken bharta, in my opinion, should make it to the international culinary arena right alongside Chicken tikka masalas and butter chickens. It's so versatile in spices that a little less to suit international palates does not make this a lesser version.I have tried making "chicken bharta" a few times before....every time I felt "not quite there yet".My standard  was a roadside eatery somewhere between Kolkata and Liluah.I just can't remember the name.This time I was able to achieve something I felt did justice to what I had eaten in that dhaba.
Step 1 :Boil the chicken in the spices
Chicken -4 thigh pieces/Breast pieces will also do
Vinegar-2 tablespoons
Crushed peppercorn-1 teaspoon
Crushed garlic-2 cloves
Crushed coriander-  1 tablespoon
Salt -1 tablespoon


Boil the chicken with just enough water to cover the chicken.Place a lid on the pan and boil for about 20 mins or till chicken is tender.


Step 2 :Shred the chicken
Once chicken is done take them out and pull them into thread like pieces with a fork.Reserve the water for gravy.


Step 3 : Making  the gravy
Onion-1 big chopped
Tomato-1 medium chopped(optional...if you want your bharta to look whiter you can skip tomato)
Ginger paste-1 tablespoon
Garlic paste-1 tablespoon
Cashew paste-1 cup ( can be substituted with charmagaz )
Bay leaf-1 big
Green cardamom-5
Cloves-5
Heavy cream or Sour cream-1/2 cup
Red chili powder-1 teaspoon
Coriander powder-1 tablespoon
Cumin powder-1tablespoon
Kasuri methi/Dry Roasted and ground fenugreek seeds-1 tablespoon
Boiled eggs-2 sliced into quarters.
Salt to taste
Oil-4 tablespoons
Butter-2 tablespoons

In a kadhai/wok heat the oil and add the bay leaf,the green cardamom and cloves.Once they release their fragrance add the onions.Fry the onions till light golden and add the ginger and garlic paste.Fry a little and then add in the tomatoes.Once the tomatoes are done and start to leave the oil add the red chili powder,coriander powder and cumin powder made into a paste with some water. Once these dry spices are cooked add in the shredded chicken and add some salt.Stir for 3-4 mins so that the chicken takes on some color and the spices.Now add the cashew paste and stir.Add in the sour cream or the heavy cream.Now add in the sliced eggs.Let the yolks mix into the spices with the stirring.The boiled yolks will become a part of the gravy....that is the specialty of chicken bharta. Now add in the reserved water in which the chicken was boiled.....how much you want to add will depend on how much gravy you want.In the end add the kasuri methi or the ground fenugreek seeds.Serve hot with the butter melting on top.


Thursday, July 11, 2013

Penne Rigate with broccoli and chicken......simple and delicious pasta dish.

This is one of those recipes you fall back on when you want dinner made fast and with few dishes to wash afterwards.I have made this recipe with Angel Hair pasta too but it comes out the best with Penne Rigate. The hollow pipe shape makes sure the creamy sauce sticks on and the pasta tastes better.I like the broccoli in this pasta and can make it sans the chicken.With the chicken you have a complete meal of protein,carbohydrates and the veggies.
I checked the pasta packet and to my surprise, 1/2 cup of the raw pasta was 200 calories.I was under the impression that 1 cup of raw pasta was a single serving....certainly not in this case.I generally do a metal calorie summation when I cook with calorie rich ingredients like cream and cheese.This recipe was going to have cream and 2 types of cheese-both mozzarella and Parmesan. The Parmesan and cream go into the making of the sauce and the mozzarella to create the sticky texture on the top.
I had to re-evaluate and substitute to get the calorie count into a moderate range for this recipe to be a regular dinner on a regular day.With the modified recipe the calorie count will be about 450 calories per serving and it tastes almost as good as the full on calorie version.

Penne Rigate pasta-2 cups dry
Broccoli florets-4 cups
Whole milk-1 cup
Parmesan cheese-1 cup
Chili flakes-1 teaspoon
Chicken-1 breast piece/1 thigh piece cut into 1-2 inch strips
Garlic-1 clove minced
Crushed pepper-1 teaspoon
Salt-to taste
Olive oil-2 tablespoons

Boil your pasta according to the cooking instructions on the packet.Mine said 11 mins.I like my broccoli not too mushy.....8 mins for boiling my broccoli is good.So I added the broccoli to the boiling pasta water after 3 mins of adding the pasta.When done strain them and keep aside.
While your pasta and broccoli is bubbling away,season the chicken strips with pepper and salt.Heat the oil and fry the chicken strips..... in about 4-5 mins it will get a nice light golden color.I think mine were done about 6 minutes...it acquired a little more color.Add in the crushed garlic and give it about 30 sec to release it's flavor.My olive oil is garlic flavored so I did not add the garlic. Add the chili flakes and then add in the milk.When the milk heats up stir in the Parmesan cheese.Stir till it turns into a sauce.Add in the pasta and the broccoli and coat with this cheesy sauce.Adjust seasoning and you have dinner ready for 4 in 20 mins.


Wednesday, July 10, 2013

Lima Beans in a Konkani style curry.

I had no idea what Lima beans were till my Konkani friend brought it in her lunch box.Big "rajma" (kidney beans) like beans only green in color.Took a spoonful from her lunch box and became a big fan of this fresh green bean seed.I asked her to check with her mother how it was prepared.Well..... I asked her first and she said, she only know her part in the preparation and that was getting the seeds out of the beans for her mother to cook.Scary I thought.....who has the time for that in today's world of Frozen Peas,Frozen corn.That was back in Bangalore.Anyways she did give me her mother's recipe which I partly remembered when I chanced upon packets of Lima beans in the Frozen Food section of Hannaford in US.
Here is how I make the Lima beans.It tastes the same like my friend's mother's except for 2 things which usually I  don't have in my Bengali Kitchen-Tamarind and Curry leaves.I substitute the Tamarind with Tomatoes and omit the Curry leaves.

Frozen Lima beans-1 pound packet
Onion-1 medium chopped fine
Tomato-1 medium cubed
Coconut-1 cup
Garlic cloves-3 big
Dried red chili-4
Cumin seeds-1 tablespoon
Cumin powder-1 tablespoon
Corriander powder-1 tablespoon
Turmeric powder-1/2 teaspoon
Salt to taste
Oil-4 tablespoons

First grind the red chili,garlic cloves and the coconut in a grinder/blender to a nice paste.Now in a pressure cooker heat the oil and splutter the cumin seeds.Add the chopped onions and fry for about 3-4 minutes.Add the cubed tomatoes and fry till the oil separates.Now add the ground paste and fry again till oil starts separating.Add the cumin powder,coriander powder, turmeric powder and salt.Give it a few stirs to get the dry spice powder mixed up well.Now add the lima beans and stir till all the beans and the masala mixes together.Now add 4-5 cups of water put the lid on the cooker and cook the beans till 4 whistles.Check the beans when cooked.Press one bean between your fingers,it should melt like butter.If it doesn't you need to cook for a whistle more.

Tuesday, July 9, 2013

Lau er khosha bhala.......Fried bottle gourd peels.

I credit myself with knowing how to buy a "kochi lau"(a bottle gourd which does not have too many seeds).It's something I learnt from my mother.When you are buying bottle gourd you need to choose the shape that is a uniform longish shape.The ones with the little round at the bottom will have more seed.Now poke the bottom end  of your selected gourd with the nail tip of your index finger.If it slides smoothly through the skin,it's good to buy.If the skin is hard your nail tip will not slide smoothly....and that is a gourd which will have more seeds.When my mother and I used to go to the vegetable market,I would try this technique on multiple gourds and then tell my mother which one I thought was the "kochi"est.She would check and give her opinion.It didn't take a long time to get her approval on my selection..... consistently!!!Once you are able to understand the feel that you get when your nail tip slides into a "kochi" bottle gourd's skin.......you will be successful in picking up a fresh gourd every time.After so much of effort to pick up a "kochi" lau....who would like to waste the beautiful peel?..........specially when it tastes so good on it's own.
This post is on how to cut the gourd peels and fry it for a scrumptious side dish to go with plain rice.


You need to peel the gourd a little thick .....so you cannot use a peeler.Use a knife and peel about 1/8th of an inch(approx) skins.I cut the gourd into rounds about 2-3 inches in width and then peel the skin.I can manage it better that ways.Once all the peeling is done,take the peels and run the sharp tip of your knife to create match stick size pieces.

For frying the peels,
Oil-1 tablespoon
Green chili/Dried Red chili-2
Nigella seeds-1 teaspoon
Turmeric-1/2 teaspoon
Salt-to taste

In a pan heat the oil,put in the nigella seeds and the chilies.Allow the nigella seeds to start crackling.Now add all the chopped peels.Stir for sometime and then add the turmeric.Now put the flame on low and cover the pan.It will take 8-10 min for the peels to become soft.Once soft ,take the cover out ,add salt to taste and give it a few more stirs.The more you stir and fry,the peels will become more crispy and ahem tasty.....:-) but you will be missing out on the nutrients.I serve the" lauer khosha bhaja" not too crispy...it retains some moisture in it to mix up with plain rice and eat.The very crispy bhaja I will probably serve with daal.

Dhokar dalna.......fried lentil squares in a gravy.

Our family has a temple devoted to "madan mohan" in North Kolkata. Apart from all festivals associated with Lord Krishna,we used to have a decent sized  Durga pujo in the temple."Dhokar dalna" was one thing that would always be cooked along with the rest of the " pujor bhog".During lunch time I would keep a vigilant watch for the serving of this scrumptious curried fritters........so enticing in it's rich red gravy.At home the "dhokar dalna" would never have the same taste or the look..I used to believe it was the miracle of God that all the cooking that day would taste so heavenly.Now after having cooked quite a bit ,i realize a big part for everything tasting so delicious was the fervor and enthusiasm of all "kakimas-jethima and thakumas"(aunts and grannies).They would make sure that all the red chilies,cumin ,coriander and spices that needed to be ground were freshly ground.You can not beat the taste of "bata masala"(freshly made spice paste) with "guro masala"(store bought dry powder spices).They would ensure that there was abundant supply of Ghee (clarified butter) to fry and curry things in.The recipe for "dhokar dalna" that I am sharing now is with 1 cup of refined oil and dry spices out of the packet.It makes enough for 8 adults and a few kids(assuming that you will have a couple more side dishes to go along.) Of course you can upgrade the recipe in taste and look by grinding your own fresh spice paste and using more ghee.I love it when the red ghee floats up to the top...very inviting :-)
Most dhoka recipes use "cholar daal" ie chana daal but my thakuma used a mix of "matar daal"(Split yellow peas) and "cholar daal".I have compared the taste. I have taken feedback from Daddy D and we both agree that the "matar daal" and "cholar daal"  mix tastes much better.It's lighter in taste and feel and absorbs the spices in the gravy better.
Soak these daals overnight.
Matar daal-1 cup
Cholar daal-1/2 cup

The next day grind the soaked lentils with
Ginger-1/2 inch piece
Green chili-2
Make sure that you drain out the excess water from the soaked lentils.If you need additional water for grinding add by spoonfuls.

For making the dhokas
Oil-2 + 1/2 tablespoon for greasing plate.
Cumin powder-1 teaspoon
Turmeric-1/2 teaspoon
Salt-to taste
In a pan heat 2 tablespoons of oil and add the ground lentils.Keep stirring.The water will evaporate and we will try to achieve a putty like consistency.Add in the cumin powder,turmeric and salt and keep stirring till the  lentil mixture starts leaving the sides of the pan and starts accumulating on the stirrer like a sticky putty.Now take out the lentil mixture and pour it in a place which has been greased with 1/2 table spoon of oil and pat it to level.Allow it to cool for 30-45 mins.
Now run a knife through and cut pieces of the "dhoka" squares,diamonds whatever suits your fancy.Separate the cut "dhokas" carefully.
In about a cup of oil fry these cut "dhoka" pieces a light golden color.Set aside the fried "dhokas".


For the "jhol" or curry
Bay leaves-1 Big
Green cardamom-4
Cinnamon-2 sticks
Cloves-4
Tomatoes-1 cup chopped
Ginger paste-1 teaspoon
Cumin powder-1 tablespoon
Coriander powder-1 tablespoon
Red chili powder-1/2 tablespoon
Turmeric powder-1/2 teaspoon
Sugar-1 teaspoon
Ghee -1 tablespoon
Garam masala powder-1 teaspoon
Warm Water -3 cups
Salt-to taste
Oil-whatever is remaining from frying the "dhokas" will do.If you want to add more,it's perfectly fine.

Heat the remaining oil from frying the dhokas and add the sugar.Let the sugar turn a little orange and add in the bay leaf,green cardamom,cinnamon and cloves.Keep the heat low to avoid the sugar or the whole spices from burning up.Now add the chopped tomatoes and the ginger paste.Let the tomatoes melt and let the oil separate.Now make a paste of the cumin powder,coriander powder,turmeric powder and chili powder with a couple of teaspoons of water.Add this paste to the pan.Mix well and let the spices cook with the tomatoes.Now add some salt and 3 cups of warm water.Let the curry come to a nice boil....now add in the fried "dhokas".After the last dhoka goes into the curry switch off the heat.Now add the tablespoon of ghee and the teaspoon of garam masala and put a lid on the pan. Allow the "dhoka" to absorb the spices and the gravy.After 15 minutes your dhoka jhol will be good to eat.We like ours with rice -plain white or pilaf.


Saturday, June 29, 2013

Pepe diye Kancha moong daal...........Lentils cooked with Raw Papaya.


Raw papaya or pepe is very good for the stomach.My mother used to put raw papaya in "sheddo" (boiled) almost everyday.My father would have the boiled papaya with his rice for lunch.It was like a tonic for them to keep their body functions well oiled. Boiled papaya and 2 cloves of raw garlic....that's what takes, to keep the doctor away...at least in our household.
I could eat the papaya fruit but papaya the vegetable I started eating much later.Even today my initial reaction to a full fledged "peper tarkari" (vegetable of raw papaya) would a cringe.I can eat this vegetable either in a lentil....like the one for which this post is or covered in gram flour.I will share the gram flour recipe sometime...that is not a bong way of making this vegetable.I believe it is the rajasthani way.

For making the daal
Raw papaya- 2 cups( peeled, seeded and cubed about 1 inch)
Moong daal-2/3 cup
Turmeric-1/2 teaspoon
Sugar-1 teaspoon
Salt-to taste

Daal Tadka
Ghee-1 tablespoon
Bay leaf-1 big
Cumin seeds-1 teaspoon
Chili-2-3 (Red /green)

Take a pressure cooker and pressure cook the raw papaya with the moong dal.Add a little salt,turmeric and sugar in the pressure cooker.Cook till 1 whistle and allow the pressure cooker to cool a little so that you can open the lid.Now take a small pan,heat the ghee in the pan and add all your item for tadka- the bay leaf,chilies and cumin seeds.Open the lid of the pressure cooker and add the tadka to the boiled daal and papaya.Now put the lid back and pressure cook just till the point where the cooker forms enough steam.Turn off the heat just before it whistles.

This daal is mild but has a beautiful taste.It's ideal for a hot sultry afternoon with hot rice and any "bhaja"(Fries) on the side.


Friday, June 28, 2013

Panchmeshali tarkari panchphoron diye..........Mixed vegetables with Fivespice.

This panchmeshali tarkari was my dinner along with a bowl of "daal" and a piece of fish for almost a year.Why??I was on a weight watch for my marriage ;).And YES it works.It worked much better than the General Motors diet...which I fail miserably at.After the turmoil of just bananas and milk on the 4th day(as if I am a snake)....I just can't take the overdose of tomatoes on the 5th day.
This tarkari works for me because you can change the taste by adding a little "posto bata"(poppy seed paste) or a little "shorshe bata"(mustard seed paste) at the end.You can add a little complexity by adding a little"kalo chola"(black gram) soaked overnight in water to this vegetable. "Bori' works well.Sometimes my mother used to add some soy nuggets to this.Trust me you will not get bored of eating the same thing.....the little variations and the choice of your 5 vegetables take care of that.
This mixed vegetable is steam cooked in the vegetable's own juices, so fresher the vegetables better is the end result.
"Panchphoron"-a spice mix of mustard seeds,nigella seeds,fenugreek seeks,fennel seeds and cumin seeds......present in most bengali kitchens.You can make your own or buy it from the store.

Five vegetables I made my tarkari out of -eggplant,radish,carrots,wax gourd (parval) and potatoes.You need to cut your vegetables in sizes so that the cooking time for all of them is almost the same.
Apart from the chopped vegetables,you will need
Oil-1 tablespoon
Panchphoron( Five spice mix)-1 tablespoon
Chili-2 (I used dried red chili.....i am out of fresh green ones)
Sugar-1/2 tablespoon
Cumin powder-1 tablespoon
Turmeric powder-1/2tablespoon
Salt-to taste

Heat the oil in a pan.Add the panchphoron and the chili to the oil.Let it splutter.Now add all the vegetables and mix it with the panchphoron. Add the sugar ,turmeric and cumin powder.Give it a minute and then cover your pan with a lid.Put your flame on low so that the juices from the vegetables will start to come out and your vegetables start cooking.You will be able to smell it when your vegetables are done.If you vegetables are really fresh,it will take about 20 minutes.Now add in the salt and serve.

If you want to add either mustard paste or poppy seed paste,you'll first need to make the paste with a little salt and a green chilly.Add the paste to the vegetables 5 minutes before you take the pan off the heat.Mix the paste well with the vegetables.

If you want to add black gram,soak it overnight in water.Add the soaked gram to the oil along with the chili and the panchphoron.Fry the gram for a minute before adding the vegetables.

If you want to add the bori. Fry the bori separately in oil.Add a couple of mins before you take the vegetable off the heat.

If you want to add soy nuggets,soak the nuggets in hot water for 20 mins or till they are completely soft.Do a squeeze test on them.Squeeze them to see if they are absorbing water like a sponge.Add the soaked nuggets 5 mins before you take the mixed vegetables off the heat.If you are adding nuggets,you might need to add 1 more spoon of cumin powder or your "tarkari" might turn out a bit bland.


Wednesday, June 26, 2013

Cholar daaler Borar jhol.........lentil fritters in a gravy

A friend's mother used to make this awesome jhol as the special "ranna" on Saturdays which in a lot of Bengali households in reserved for "niramish".The first time I had it, I went beyond second helping to the third helping.Believe me I would have had more if it was humanly possible.I asked Aunty for the recipe and passed it on to my mother.I had high hopes that my mother would create the borar jhol magic in our household.There was just one hitch in the recipe,the boras need to be deep fried!!!My mother imagines clogged arteries,cholesterol,massive heart attacks when someone tells her to "deep fry".So the magic ended in our household. Aunty knowing how much I loved the borar jhol tried to make it on the Saturdays she knew I was visiting.
I tried to create the borar jhol magic in my household last week.It was a decent attempt.I say decent because I forgot to whip the daal batter before frying the boras. Aunty had said "daal bata ta bhalo kore haath diye phetiye nish"(whip the daal batter with your hand).
Being my mother's daughter,I did not really deep fry the boras. I don't have a small kadhai ......I have a massive kadhai which serves well when we have guests.....for deep frying you need to put close to a litre of oil in it.I panicked at about 250 ml I think.The boras will become bigger in oil....since I did not have enough oil to submerge them,the boras instead of rising in height from the hot air inside were spilling a little from the sides. So if you want to make this dish right .....Be Brave with oil....or get a small kadhai.

For the bora
Cholar daal/Chana daal-1 cup soaked for about 2 hrs
Kalo jeera/nigella seeds-1/2 teaspoon
Green chili-2
Ginger-1 inch piece
Salt-to taste

Grind the daal with the nigella seeds,chilies and the ginger.Make sure you take out all the excess water from the daal before grinding.The daal will grind in the water that it has absorbed.Now take the daal out and add salt....a little less than a teaspoon is a good amount.The boras absorb the gravy which will have salt....so a little less salt when you are frying is fine.Now whip the daal a little to make it light.Get some air inside so that it becomes fluffy when you fry it.A minute of whipping is good enough.Now make 1 inch small balls of this daal paste and deep fry in hot oil.When deep golden brown take it out and keep aside.My experience on frying is that when you put the daal batter in the oil,your heat should be on high.After that the heat should be put on medium for the boras to cook thoroughly and to get the gradual deep golden brown color.

For the jhol
Ginger paste-1/2 tablespoon
Nigella seeds-1 teaspoon
Red chilli paste-1 teaspoon(Soak 4-5 dried red chilies in some water and grind it to a paste)
Cumin powder-1 tablespoon
Coriander powder-1 tablespoon
Turmeric powder-1/2 tablespoon
Sugar-1/2 tablespoon
Salt-to taste
Potatoes-1 medium sliced and fried (You can fry the potatoes after the boras are fried)
Oil-2 tablespoons

First make a paste of the cumin powder,coriander powder,turmeric powder in about 2-3 tablespoons of water. We generally make a paste out of our dry masalas before putting it in the oil,the masalas don't burn this way.
Now in a pan,heat oil.Put in the nigella seeds add in the sugar.Let the sugar turn red before adding the red chili paste.The color of your oil will change a nice red from the frying chilies.Add the ginger paste and follow with the dry masala paste that you made.Ginger if you fry too much in oil turns a little bitter...so let the ginger cook with the masala paste. Now add the fried potatoes and about 3 cups of water to make the gravy.Add salt to taste.Once the gravy has come to a boil add the boras and let it boil for a couple of minutes before turning off the heat.The boras will soak a lot of the gravy so don't fret 3 cups of water is not a lot.
The proportions make about 10 boras. I put 8 in the gravy...you can take a guess on the missing 2:-)


Mulor Ghonto.......Radish cooked the bong way.

What can you do with fresh radish from the farm?..........if you are a bong like me you make it into a "ghonto".A "ghonto" is a mish mash of a few vegetables,may include a fried fish head at times.
When the vegetables are gorgeously fresh, i like to keep the rest of the things simple.The only pain in this recipe is the grating of the "mulo". Actually once you get started on the grating,it does not take much time and is not really that painful.The pain for me is getting started.Once I had my grater in place,it was all zip zap zoom.
I grated about 4 cups of raw radish which turned into 2/3 cup of "mulo ghanto".You can add potatoes to increase the quantity.My dida used to add happy amounts of potato to her cooking when her household of 2 members used to balloon into a full house of 10 during vacations.I am not complaining, i like my potatoes.
If you are using potatoes,cube your potatoes into 1 inch cubes and fry it till soft before you start with the ghanto. Add it to the ghonto 5 mins before the ghonto gets done.

For mulo ghonto you will need. 

Grated radish-4 cups 
Mustard seeds/Benarasi Rai-1 teaspoon
Dried Red chili-2
Turmeric powder-1/2 teaspoon
Grated coconut-4 teaspoons
Salt-to taste
Vegetable oil-2 tablespoons

I prefer the benarasi rai in my mulo ghanto but you can go ahead with mustard seeds.Heat your oil in a pan and once it is moderately hot add your teaspoon of mustard seeds and your red chilies.Now add the grated radish.Add the turmeric and the salt.Let the radish cook down considerably then add in the coconut.You can use coconut pieces also.If you are using coconut pieces, add the coconut to the oil before the radish and fry it in the oil for a few seconds.If you want to add your fried potatoes,add the potatoes and mix it into the radish.Your "mulor ghonto" is ready to be served with plain rice.
The radish does not take long to cook because it is grated,your "ghonto" should be done in about 10 mins on moderate heat.

Thursday, June 20, 2013

Fried Rice with chicken and scrambled eggs........one wok makeover of leftover rice.

There are some evenings when you are just exhausted.This fried rice is the dinner solution for those evenings.One wok/pan to clean later is as enticing a prospect as the meal itself.This dish works best with leftover rice right out of the fridge.Just prepared rice will have more water and turns the dish a bit mushy.But I have made this dish with just made rice too.Taste is still great.

Boneless Chicken-1 cup (roughly 1 inch pieces)
White vinegar-1 tablespoon
Soy sauce-1 tablespoon
Garlic paste-1 clove
Pepper powder-1/2 tablespoon
Salt -to taste
Oil-3-4 table spoons

Marinate the chicken with all the ingredients except oil and leave for 20 minutes.In this 20 minutes,you can chop up some vegetables and scramble some eggs.(2-3 eggs)

Onions-1 small sliced into half moons
Peppers-Red/Green/Yellow-about a cup
Mushrooms-sliced about a cup
Garlic- 2 cloves sliced
Green chilies-2 chopped/sliced

Just a few more things to do.
Take the rice out of the fridge.Run a fork through it to separate the grains a bit.I had about 4 cups of cooked rice.
Soy sauce-2 spoons
White Vinegar-2 spoons
Salt-to taste
Pepper-1 teaspoon/ to taste
Salad leaves(optional..... I usually have salad leaves in my fridge....an iceberg lettuce,red cabbage and carrot mix)

Your 20 mins are up now :-).
In a wok,heat the oil to fry the marinated chicken.It will take about 5-6 minutes on high flame for the chicken to get soft and acquire a light tan color on the surface.Take out all the chicken pieces and keep aside.Now to the remaining oil in the wok, add the onions(Flame on high......I use my Power Burner on high).Once onions are done,should be done in a couple of minutes, put in the chopped peppers,garlic,
mushrooms and chilies.If your flame is high,it will take a minute with constant stirring for the vegetables to be done.Put in the 2 tablespoons of soy sauce and vinegar each.Season with salt and pepper. Add the fried chicken back to the wok.Now add in the rice and mix everything up real good.Add in your scrambled eggs and your salad leaves now.Put the heat off or your salad leaves will wilt and lose the crunch.Adjust for seasoning and serve.
Your one wok no fuss dinner is ready.

Wednesday, June 19, 2013

Biscuits with caramel sauce....little effort sweet results!!!

This is a real simple recipe for a great weekend breakfast.This is Carla Hall's recipe which I tweaked a little for the ingredients available at home.If you have buttermilk at home you can use that instead of the yogurt and milk to mix your dry ingredients.She used fresh strawberries and cream,I made a caramel sauce to spread in between the biscuits.If you want to go for a fruity spread,you can replace the cinnamon in the dry mix with lemon zest.Trust me waking up to the beautiful smell of baking on a Sunday morning, hot biscuits straight from the oven can help you score brownie points with anyone.Try it.....:-)
The Dry Mix
All purpose flour-1 cup
Baking powder-2 teaspoons
Salt-1/2 teaspoon
Butter-2 tablespoons(chilled works the best cut into small pieces)
Cinnamon powder-2 pinches
Sugar-3 tablespoons
The Wet Mix
Yogurt-3 tablespoons
Milk-1 cup(chilled works better)
Put all the ingredients of the dry mix in a mixing bowl except the butter and whisk around a few times to mix it all up.Now add the butter and just give the butter pieces a little press with your thumb and index finger.The mix should now have a sandy/grainy texture.The reason for not mixing the butter in, like you would in a cake batter, is that, the butter lumps in this mix will make the airy holes when it bakes.Butter has water and when it bakes the steam that it releases lifts the biscuits and creates those holes that we all love in biscuits.Once all your butter pieces are pressed out, add the yogurt and milk and whisk it all in.Now take a big spoon and roll out spoonfuls of the biscuit mix on your baking sheet lined with parchment paper.I actually rolled mine in some dry flour before putting them on the baking tray,but the  parchment paper is good enough for the biscuits not sticking at the base.The biscuit will spread and rise so leave 2 inch space in between .Bake in a preheated oven at 375 F for about 15 mins.Let it cool for 10 mins before slicing it through to spread the caramel sauce.  
For the caramel sauce
Sugar-4 tablespoons
Water-2 tablespoons
Salt-a really tiny pinch
Heavy cream-1 tablespoon(optional)
Butter-1 tablespoon
Vanilla essence-2-3 drops

If you can find a heavy bottomed pan for making the sauce,it would be perfect....other pans are also fine,it's just that you have to be more careful with the heat so that the sugar does not burn.In the pan add sugar and water and heat it on low flame till the sugar dissolves fully in the water.When it starts forming little bubbles around the corner  add in the salt , the butter and the vanilla essence.Keep stirring till the color changes to light golden.Now you can add in the cream and let the sauce come to a bubble before taking it off the heat.Allow the sauce to cool a little before spreading it between the biscuits.

Happy Baking!

Monday, June 17, 2013

Aamer Kheer or Mango Pudding......welcome summer!

My mother over a phone conversation told me that this year there was a bounty of mangoes in the market.Hmm....mangoes.As a child or teenager ,I was never a fan of this Indian "king of fruits".Things are different now.......i don't get the varieties I grew up with and my heart yearns for the smell of a "langra" or "himsagar".
The local supermarket sells 2 varieties of mangoes,both products of Mexico.One of them had a nice fragrant smell,and a reddish green skin.The other one did not have any smell but had a beautiful yellow skin.I picked the one which had the fragrant smell....I took my chances and it paid off.This mango was sweet and had a mild taste.I liked it.
I decided to make mango Kheer with about 2 cups of pureed mango pulp.Taking out the pulp is the messy part, once that is behind you, rest is very simple.
For making the pulp,first peel the mangoes.Taste the mangoes and pulp only those mangoes that are sweet or at least not tart.Sour /tart mangoes will not work for this recipe.Slice out the fleshy mango chunks with a knife and put it through a blender(You can add some milk for blending).Now pass the pureed mango pulp through a strainer and reserve it for the recipe.
For the Kheer you will need
Condensed Milk-1 cup
Whole Milk-2 cups
Mava-100 grams
Ghee-1 tablespoon
Semolina(sooji)-2 tablespoons
Sugar-5-6 tablespoons
Mango pulp-2 cups
Cubed mangoes-about 1 cup(as small as you can cube whithout making them squishy)
Raisins(kishmish)-to garnish

Heat the ghee in a Kadhai/pan.Once hot, add the semolina.Roast the semolina on a medium flame till it gets a reddish color(not brown.....just a nice tint).Now add in the milk.Once milk comes to a boil add the condensed milk.Let the entire mixture come to a boil then add in the mava.Break the mava in small pieces so that it dissolves easily into the mixture.Once the mava is fully dissolved,add the mango pulp.Keep stirring or the kheer will start burning from the bottom.Add in the sugar.Give it a taste.If you need more sugar....add more.Take the Kheer off the heat, a little before the consistency you desire because it will thicken a little during the cooling process.Once the kheer cools down to room temperature add in the cubed mangoes and fold it into the Kheer.
You can add saffron also at this stage.Just soak 3-4 strands of saffron in a small bowl of warm milk and wait for 10 mins.Now add the saffron infused milk into the Kheer.
Now you can refrigerate the Mango Kheer. Garnish it with raisins before serving.
Being the first mango that we bought of the season,I first offered it to God like I have seen my Grandmother do.....it truly is food for the Gods.


Friday, June 14, 2013

Kala chana Kebab/patties......black gram spiced up.

This was a good way to use up the Black gram that was lying in my Kitchen cabinet for a very long time.We get these huge 2 pound packets of lentils/grams,and the only use of kala chana in our regular cooking is putting it in our "paanchmeshali tarkari' or "aloo kumro".
This finger food with evening tea was a good way to see the last of black chana. To make about 8-10 kebabs you will need
Boiled and mashed up black gram-2 cups
Chopped onions-4 tablespoons(1/2 of an mid sized onion)
Chopped green chilies-1 tablespoon
Crushed garlic-1 tablespoon
Ginger paste-1/2 tablespoon
Yogurt- 2 tablespoons
Garam masala/Dabeli/Pav bhaji masala/Chat masala-2 tablespoons(Anything will do)
Coriander powder-1 tablespoon
Roasted cumin powder-1 tablespoon
Oil-2 tablespoons + to grill the kebabs
Fresh chopped coriander-4 tablespoons
Salt-1 teaspoon or to taste.

First soak the kala chana overnight.Boil it with some salt till the chana is really soft.I boiled it for 3 whistles.Drain the water and mash it with a masher....i did it with my "daaler kanta".
In a pan add 2 tablespoons of oil,add in the chopped onions and fry the onions till they are pink and translucent.Now add the green chili,garlic and ginger and fry for about a minute.Add in the yogurt,to stop the onions and the masala from getting stuck to the frying pan.Now add in the coriander powder,cumin powder and the garam masala powder.I added dabeli masala powder...it worked .Once all the masala is cooked add in the mashed kala chana. Add salt and adjust the seasoning to your liking.If you want more heat you can add a tablespoon of chili powder.We use chilies very sparingly because of toddler in the house.Once everything is mixed up well take it off the heat and now add the fresh chopped coriander.
Now make round balls and flatten them with the palms of your hand and place it on a hot frying pan(tava) or grill.Put a spoon of oil on top of the Kebab or patties and turn them.It takes about a minute on each side to get the color.
Now you can serve them as an evening snack with a mayonnaise and sriracha dip(just take equal quantities of mayo and srirach and mix it....nice spicy and creamy dip)  or you can make big sized patties and put them in between burgers.


Wednesday, June 12, 2013

Dimer Jhol......Boiled Egg curry

Daddy D loves eggs.My mother in law tells me that when Daddy D was a little boy,his birthday breakfast was "double dimer omelette"(omelette made with 2 eggs),regular days it was one egg omelette:-).
"Dimer jhol" always comes to rescue my week when I am out of poultry,fish or meat.We are never out of Eggs.It makes the grocery list along with Milk and Bread.
In bengali cooking, we curry the eggs after frying the boiled eggs.I am very used to it.I could never understand ,why weren't the boiled eggs fried before currying it in my college canteen in Maharashtra,egg biryani in Chennai railway station,or lunch tray at my office food court in Bangalore.They taste and look a lot better once they get the nice reddish golden color on them.The outer skin gets a crispy layer but it's still soft inside.I do recommend frying.
I made the dimer jhol with 6 boiled eggs.For currying 6 eggs you will need
Potatoes boiled and quartered-2 large
Onion-1 large finely chopped
Tomato-1 medium chopped
Green chili-1-2 (depending on how hot you want)
Ginger paste-1 tablespoon
Garlic paste-1 tablespoon
Cumin seeds-1 teaspoon
Cinnamon stick-2-3 sticks
Bay leaf-1 large
Green cardamom-2-3
Cloves-2-3
Red chili powder-1 teaspoon(My chili powder packs a lot of heat so I used 1/2 teaspoon.)
Cumin power-1 tablespoon
Coriander powder-1 tablespoon
Turmeric-1 teaspoon
Sugar-1/2 teaspoon
Mustard oil-4 tablespoons
Ghee-1 tablespoon
Salt-to taste

First make little slits on the body of the egg with a knife, 2-3 longitudinally.This will let the heat to escape when the eggs are fried,otherwise the eggs might burst a little.Now sprinkle turmeric and salt on to the eggs and rub the spices to form a coating.Let it rest for 5-10 mins before you fry them.
 Now in a pan,I prefer a kadhai or a wok heat the mustard oil and fry the eggs on medium high heat till they acquire a reddish golden hue.If  your pan is big,you can put all the eggs at one go.On medium high heat it takes about 4 mins to get to the reddish hue.Once they are done,take them out of the oil and keep them aside.

In the remaining oil in the pan,add in the sugar and put the heat on low.As soon as the sugar starts caramelizing,add in the bay leaf,the cumin seeds,the whole garam masala-cardamom,cinnamon,cloves.Be careful not to burn the sugar or the curry will acquire a bitter taste.A lot of people wonder why bengalis add sugar to all their cooking.I can give you 2 good reasons-A little bit of sugar enhances the other tastes just like a pinch of salt in baking enhances the taste of all the baked goodies.The caramelized sugar gives a nice red color to the gravy when it floats to the top.Depending on whether you are from erst while East Bengal (Bangal) or West Bengal(Ghoti) the amount of sugar in cooking varies. Bangals put less quantity of sugar compared to their Ghoti counterparts.
Take care not to burn the cumin seeds.Heat on low is a good idea.Once the whole spices have released their flavors,add in the chopped onion.Now you can raise the heat to medium and saute the onions till they start to leave oil.Now add the green chilies slit lengthwise or just snap them in two.Add in the ginger-garlic paste.After a minute add the chopped tomatoes.Let the tomatoes melt and cook down a bit,now add the chili powder,cumin powder,corriander powder and about a tablespoon of salt. Fry for a couple of minutes till the dry spices are absorbed in the masala. Now add in the boiled potatoes.Fry for 5 more minutes so that the potatoes get a light color on their exterior.Now add in the fried boiled eggs and about a cup of water to make the gravy.Once the gravy starts boiling you can add a tablespoon of ghee on top and garnish with chopped fresh coriander.Dimer jhol is ready to be had with plain rice or pilaf.If you are having it with any Indian bread I suggest you can add just 1/2 a cup of water to make the gravy thicker.

Tuesday, June 11, 2013

Badam Halwa....an Indian dessert made with almonds.

The first time I had this rich Indian dessert it was at a friend's housewarming party in Kolkata .I learnt from my friend that badam halwa was a staple in any celebration of Marwaris, a community originally from Rajasthan with a strong presence in Kolkata. I had enjoyed the halwa, so had Daddy D.We waited for our next invite from a Marwari friend for our next fill of the halwa :-)
The next time we had badam halwa was on a Rakhi invite ...... you guessed right from another friend who happen to be Marwaris. Mrs P had made the halwa at home,taking instructions from her mother over the phone.This actually got me thinking that "oh... this can be made at home".
I didn't get to the halwa making right away.We welcomed our princess into our lives and for the next 8-9 months,cooking became an activity necessary for survival.When our princess was 9 months old,I wanted to cook again ....this time to please my baby who had started taking an interest in grown up's food.
It was during Diwali of last year, I had my third encounter with badam halwa. This time I decided I needed to know how it's made.Mrs T told me how she made it,which had "khus-khus" poppy seeds along with ground almonds.I decided to drop the poppy seeds and use just almonds.I did not want to give Baby A any poppy seeds.
The first time I made it, I reduced milk over low flame and then used it for the halwa. The next time to save effort I used condensed milk out of the tin.The result is not exactly the same.We all voted for the reduced milk at home but you can use condensed milk.Whatever suits your lifestyle....:-)

For making the halwa
Milk -1 liter
Almonds-1 cup
Sugar-3 tablespoons
Ghee-2 tablespoons

Soak the almonds overnight.Remove the skin of the soaked almonds and then grind it to a rough sandy consistency. If you need to add any liquid for grinding you can add a tablespoon of milk.The water in the soaked almonds is usually enough for a rough grind.
Reduce the milk on low heat till it become roughly about a cup in quantity.
Now in a pan heat the ghee.Add the ground almonds and fry till the rawness of the almonds goes away.It will take about 7-8 mins on a medium low flame.Now add in the reduced milk or a cup of condensed milk.
It will now start to bubble up like a halwa. Keep stirring and add in the sugar.Give it about 5 more mins to reduce and now your badam halwa is ready to be devoured.
If you are adding sweetened condensed milk,there is no need to add any sugar.


Monday, June 10, 2013

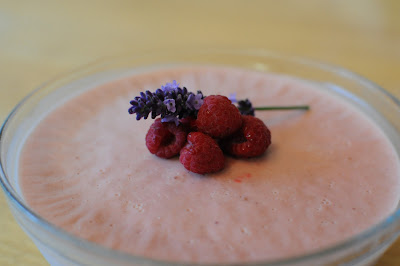
Raspberry Panna Cotta.....sweet !!!

Panna Cotta......oh I love saying it:-).It's an Italian dessert I came across when I was searching recipes for my fresh raspberries that we picked up at a Farm.Well the fresh raspberries went into a chocolate raspberry cupcake batter.....which did not turn out that great.You know it's not that great, when cupcakes are still sitting on your counter the next week!!
I had got some frozen raspberries from the supermarket to make a raspberry frosting for the cupcakes but I just did not want to put any more effort into the cupcakes.What's the point of adding more calories to the cupcakes when you will have to end up finishing it yourself.
I had a 1 pint packet of raspberries.For the recipe I needed a cup of the strained raspberry pulp.From the 1 pint packet I had about 1 and a 1/2 cup.
Before you start on this recipe,folks who do not know what they are getting into,let me just clarify that it's not ice-cream....and No it is not an Indian Kulfi!!Daddy D thought we might end up with something like Kulfi....nope that's not the case.It is panna cotta...which in Italian ,I have learnt means "cooked cream".It is frozen,creamy, lightly sweetened, a little tart from the raspberry, melts in your mouth and really easy to make.
Ingredients:
Strained Raspberry pulp-1 cup.(Use a blender and strain out the seeds.Add a little milk if blender gets stuck)
Heavy cream-2 cups  
Milk-1 cup
Flavorless gelatin-1 tablespoon
Sugar-10 tablespoons.(You can adjust the sweetness.A couple of tablespoons less or more depending on how tart your raspberry is.)
Vanilla essence-1 tablespoon

Warm your milk....tepid is fine.Add the gelatin to the milk and let the gelatin dissolve in the milk.It will take about 5 mins.In a pan on medium heat ,stir in the raspberry pulp,add the heavy cream and the sugar.Let the sugar dissolve in the mix.Add the milk with the dissolved gelatin.Add in the vanilla.I use a whisk to mix everything together.The mixture should not boil but should be warm with everything dissolved and blended in.
Now through a strainer pour this mixture into the mold/molds in which you want to freeze.I used a single glass bowl.Ramekins,small glass bowls,Popsicle molds anything will work.
Freeze for at least 4 hrs.....overnight is still better.
To take the panna cotta out of the molds just dip the molds in some hot water for a minute and then de-mold.Enjoy this light flavored desert on a hot sunny day .
I believe that you can try out any other fruit like blueberry/strawberry instead or raspberry.My next on the list is mango panna cotta :-)
Before flipping over the bowl.(That's lavender flower right out of our herb
patch resting on the raspberries)

After flipping the bowl.


Sunday, June 9, 2013

Chole-Chickpeas in a spicy hot gravy

I am posting in my blog after a very long time.In fact this is the first post of 2013!!!.Wow ...how time flies.There was a lot of interesting cooking during X'mas,diwali and of course our princess's first birthday.Let's save that for some other post:-).
I had been searching long and hard for a good chole recipe.I tried out a lot of the pre-made masalas -Indian /pakistani ,some were good some not so much.Finally last week, I hit jackpot with the chole recipe that I really liked.Daddy D makes a spicy chole recipe which I like a lot.It's kind of a salad where he mixes a lot of spies into boiled chickpeas and then pours hot ghee tempered with ajwain and diced tomatoes on top.
I have taken a little bit from Daddy D's recipe and little bits from all the recipes that I tried out in the past.
To make this chole ,first boil the chickpeas in a pressure cooker with all the below listed spices.
Chickpeas-2 cups(Soaked overnight or for 8 hours)
Ginger paste-1 tablespoon
Black salt-2 tablespoons
Bay leaves-2
Black cardamom-3-4
Cinnamon sticks-3 -4
Tea bags-3(You can alternatively make a cloth pocket and put 2 tablespoons of loose tea) 


I usually boil my chole for 3 full whistles on  medium and switch off the heat just before the fourth whistle.You will need to add 4 cups of water for boiling the chole.

Once the chole is boiled,fish the tea bags and all the whole spices out and separate the chole from the liquor.Save the liquor for making the gravy.

Now for the gravy of the chole 
Onion sliced -1 finely chopped
Tomatoes-3 finely chopped.
Green chilies-4-5 slit in he middle
Ginger chopped-1 tablespoon
Corriander powder-1 tablespoon
Cumin powder-2 tablespoons
Dry Mango powder/Amchur-2 tablespoons
Garam masala powder-1 tablespoon
Red chilly powder-1 teaspoon
Salt to taste
Oil -4 tablespoons

In a pan heat the oil and fry the onions.The onions should turn a nice golden color,a few might even turn dark brown.Be patient......... don't worry as long as brown's are only a few :-).Now add the green chillies and chopped ginger and give it a few stirs maybe a minute or less.Then add in the chopped tomatoes.Patience testing phase 2 starts now.......cook the tomatoes till every tomato melts in.Now add all your spices,the cumin,coriander,chilly powder,garam masala,amchur. Fry the masala for 2-3 minutes.You will know that the masala is done......it smells wonderful now.
Add in the separated boiled chickpeas and mix with the masala,give it a few minutes to soak up the flavors.Now add the reserved chickpea liquor.If you want a thick gravy add less of the liquor.Check for salt and adjust.
Let the chole come to a boil.

Now this is what I took from Daddy D's recipe.In a separate pan add 2 tablespoons of ghee,once the ghee is hot turn the heat off and add a tablespoon of ajwain and a tablespoon of ginger chopped up like matchsticks.Now add this to your chole.

Your chole is now ready to be devoured with poori, bhature,nan or just plain phulkas. You know it's good when your generally food fussy baby girl can't wait to get her hands into the food.