Sunday, July 21, 2013

Shukto.....slightly bitter medley of vegetables.

You cannot make "shukto" without the bitter gourd. Shukto is the "teto",the bitter needed to cleanse and prepare the palate for the rest of the delicious courses to follow.I used to hate "shukto" and all these "teto" palate cleansers as a kid.......which kid doesn't!!!I discovered my love for "shukto" and "neem begun" much much later ........when my mother had almost given up hope that I would ever be able to acquire a taste for them.
My mother in law makes wonderful shukto. She happens to be a "teto" lover and meals under her governance will always have some form of bitter ...thanks to the big neem tree in the garden......supply of bitter leaves is always an arm length away.
This is my mother in laws way of cooking "shukto" ....delicious, mildly bitter(for my sake) and very creamy.
The recipe requires "randhuni" but since we don't get "randhuni" here I have to make do with mustard seeds.
My mother-in-law fries all the vegetables like the plantain, eggplant, potatoes separately before putting it in the milk based gravy of the "shukto". I skip the separately frying,I put all the vegetables in the oil together and simmer on low heat till all veggies are soft.For my everyday cooking I prefer this low calorie version.

Vegetables:Usually potatoes,eggplant,ridge gourd,plantain and bitter gourd go into the making of shukto.
A cup of each vegetable sliced similar so that they take equal time to cook.
Randhuni/Mustard seeds-1 teaspoon
Bay leaf-1 big
Green chili-1 slit into 2
Turmeric powder-1/2 teaspoon
Sugar-1 teaspoon
Poppy seed paste-1 tablespoon
Mustard seed paste-1 tablespoon
Fresh ginger paste-1 tablespoon
Salt-to taste
Milk-1 cup
Ghee-1 tablespoon
Vegetable oil-4 tablespoons
Urad dal bori-8-10 (optional)

If you are going to add boris to your shukto,fry them in really hot oil till reddish brown and keep it aside.If the oil is not hot the boris will soak up all the oil.
Now in the remaining oil,add the randhuni/mustard seeds and the bay leaf.Let is splutter.Now add all the vegetables one by one.The plantains,the eggplant,the potatoes,the bitter gourd the ridge gourd...the order in which they take time to cook.Now add the turmeric,the sugar and some salt and cook the vegetables on low heat with a lid.The lid helps to retain the moisture of the vegetables while cooking...without the lid the veggies will become dry and you will have to add more water or more oil to continue the cooking without the veggies burning.
Once all the vegetables are soft add the mustard paste and the poppy seed paste.I, at times make "shukto" without the poppy seed paste and the mustard seed paste.........to make my life simpler.The "shukto" still tastes good.The mustard paste and the poppy paste add some richness and a tang to the "shukto".....added dimensions to the taste.In a couple of minutes the pastes will be cooked,now add the ginger and after a minute add the milk.Let the milk come to a boil add the fried boris and the ghee. Shukto is best served with plain white rice.




Friday, July 19, 2013

Kalai daaler bori...............sun dried lentil kisses.

The weather's been really hot for some time and I have been craving for "Shukto".But there is no fun in making "Shukto" if you don't have "kalai daaler bori".The Indian grocer here limits his bori varieties to the Punjabi masala vadi and the moong daal vadi. I was lucky to find cholar daaler bori also but never kalai daaler bori. I decided to take advantage of this heat wave and try something which I had seen my mother doing during our summer vacations........a balcony full of bori's drying in the hot sun.Well my mother also used to make potato chips and sabudana papads......lets save those for some other day.
I am a big fan of keeping things simple.....so this bori has just 4 ingredients
Urad daal/Kalai daal-1 cup (soaked 2-3 hrs)
Salt-1 teaspoon
Asefotida/Hing-2 squirts
Red chili powder-1/2 teaspoon
Grind the lentils after draining all the water in which the lentils were soaked.I had to add about 3 tablespoons more during the grinding process to make my grinder stop making the angry noises.It takes some time to grind it into a smooth paste....it'll get there with constant scraping of the sides...eventually.Once the lentil is a smooth paste you can take the paste out in a bowl in which you can easily whip some air into the paste, by hand.I took out the blade from my grinder bowl and whipped the air in my blender bowl itself.Add in the salt,chili and asefotida/hing at this stage and whip.Trust your hand to tell you when this whipping is done.Mine said done........ in 5 mins.

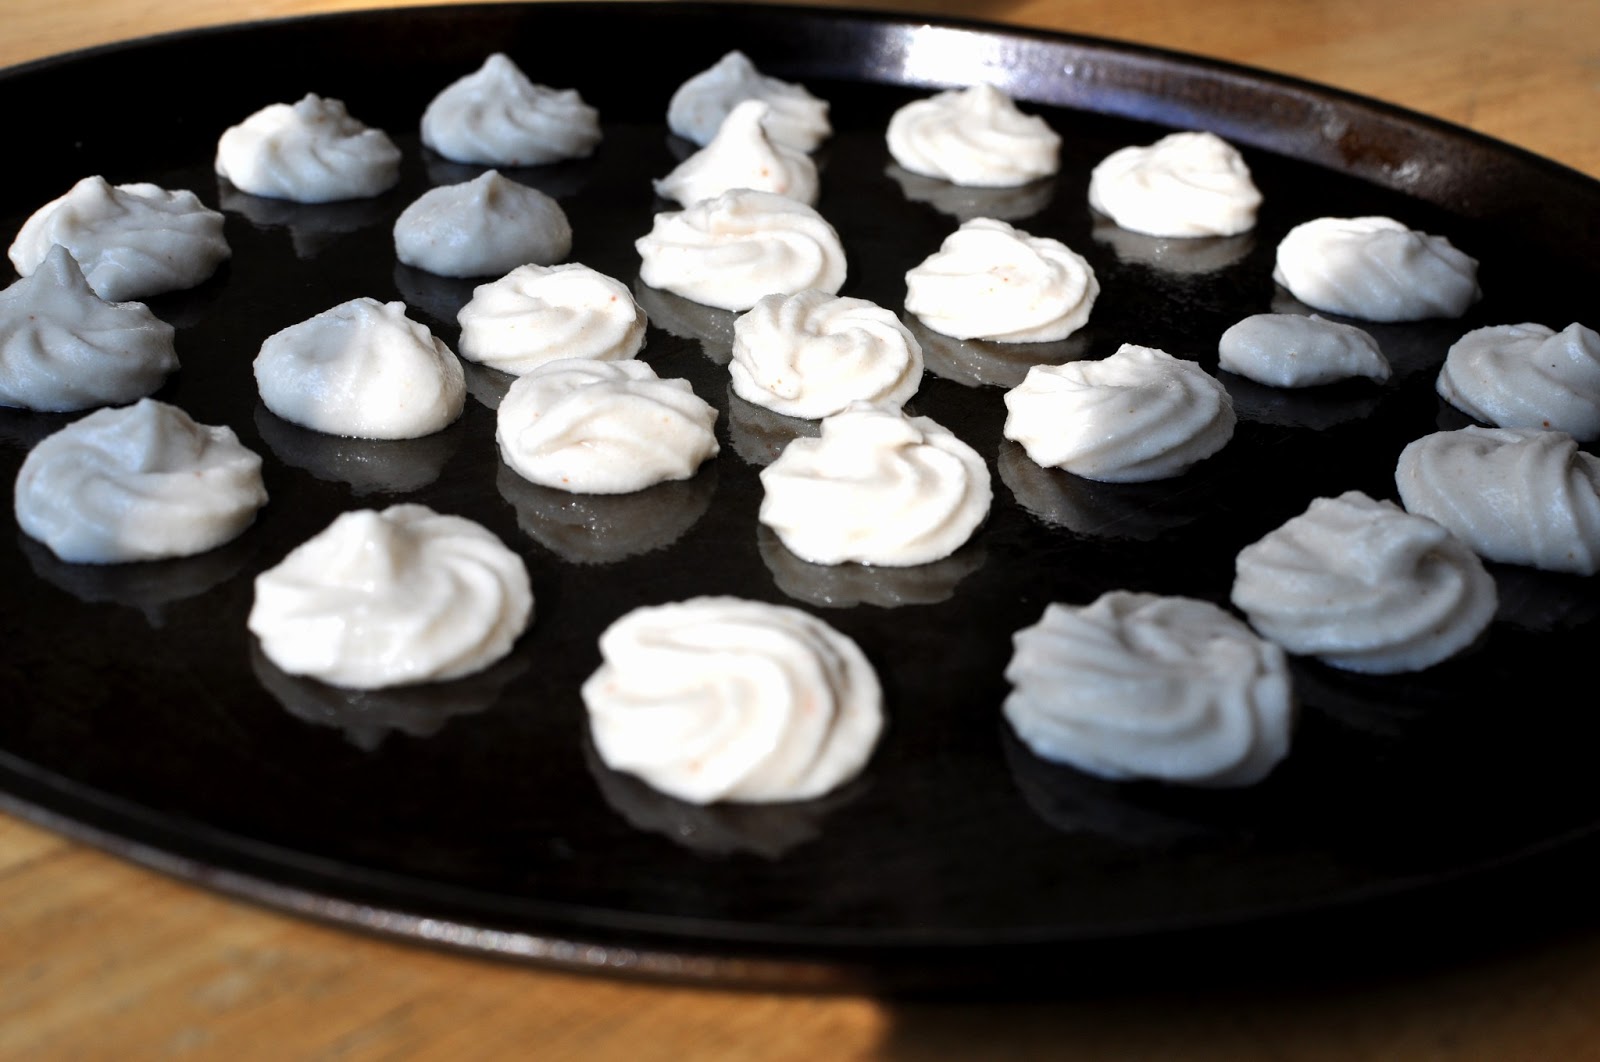
Now pipe it out on a baking tray with some oil spayed on the surface.I tried to make the" bori" shapes like Hershey's kisses with my hands but gave up after 3 tries.I then took out the biggest decorating tip that I had a Wilton 1M and piped it out in rows....much better.


I baked the "boris" first at 200 F pre-heated oven for an hour and then decided that it would be a shame not to take advantage of the outside sun.So for the next 3 days the boris dried in sun.If the weather had changed i would have continued the drying in the oven.
I fried 2 of the boris before packing them in an airtight container.....tasty crispy airy fluffy and that is when I decided it was a successful attempt which deserves a post.  

Tuesday, July 16, 2013

Carrot cake with cream cheese frosting and toasted pecans

It's such a classic cake.As soon as I saw it being made in one of the episodes of America's test Kitchen I knew I had to try my hands on this.I like to bake....it's my stress buster.I don't mind the BIG clean up that follows...the cake batter drops on the counter,frosting in the nooks of the whipper....nothing can spoil the joy of the cake rising and the smell of baking.
If I find a good cake recipe I wait for Daddy D's birthday to try it out....but this year I decided to "Lean In" :-) Inspired by Sheryl Sandberg's story of her mother who celebrated her 70th birthday by organizing her own Bar Mitzvah. She did not have one like her brothers when she was little, because it's traditionally an occasion for men.
Leaning in I baked a cake for myself on my birthday.....A first!!!The Joy of Baking to celebrate life.My Life....and I am not apologetic about it.

This is going to be a real fast post because the cake recipe and the process is very scientifically explained in the site of America's Test Kitchen.You just have to search for their carrot cake recipe.I would have loved to follow their frosting recipe too but it had Powdered buttermilk as one of the ingredients and I could not find this at my local grocers.So,I took the frosting recipe from Martha Stewart's baking site....It's yummy.
For toasting the pecans that go on the side of this cake,bake the pecans in a greased pan for 5 mins at 200 F pre heated oven.
This is what my cake looks like.I made a 2 layer cake.If you don't have an offset spatula for spreading the cake batter or the frosting, a "haata"( the big spoon with which rice is served) works fine.Use the backside of the "haata" for spreading.

Sunday, July 14, 2013

Chicken Bharta.....a kolkata dhaba speciality

There are some items which roadside eateries of Kolkata excel in making...chicken bharta is one of them.Chicken bharta, in my opinion, should make it to the international culinary arena right alongside Chicken tikka masalas and butter chickens. It's so versatile in spices that a little less to suit international palates does not make this a lesser version.I have tried making "chicken bharta" a few times before....every time I felt "not quite there yet".My standard  was a roadside eatery somewhere between Kolkata and Liluah.I just can't remember the name.This time I was able to achieve something I felt did justice to what I had eaten in that dhaba.
Step 1 :Boil the chicken in the spices
Chicken -4 thigh pieces/Breast pieces will also do
Vinegar-2 tablespoons
Crushed peppercorn-1 teaspoon
Crushed garlic-2 cloves
Crushed coriander-  1 tablespoon
Salt -1 tablespoon


Boil the chicken with just enough water to cover the chicken.Place a lid on the pan and boil for about 20 mins or till chicken is tender.


Step 2 :Shred the chicken
Once chicken is done take them out and pull them into thread like pieces with a fork.Reserve the water for gravy.


Step 3 : Making  the gravy
Onion-1 big chopped
Tomato-1 medium chopped(optional...if you want your bharta to look whiter you can skip tomato)
Ginger paste-1 tablespoon
Garlic paste-1 tablespoon
Cashew paste-1 cup ( can be substituted with charmagaz )
Bay leaf-1 big
Green cardamom-5
Cloves-5
Heavy cream or Sour cream-1/2 cup
Red chili powder-1 teaspoon
Coriander powder-1 tablespoon
Cumin powder-1tablespoon
Kasuri methi/Dry Roasted and ground fenugreek seeds-1 tablespoon
Boiled eggs-2 sliced into quarters.
Salt to taste
Oil-4 tablespoons
Butter-2 tablespoons

In a kadhai/wok heat the oil and add the bay leaf,the green cardamom and cloves.Once they release their fragrance add the onions.Fry the onions till light golden and add the ginger and garlic paste.Fry a little and then add in the tomatoes.Once the tomatoes are done and start to leave the oil add the red chili powder,coriander powder and cumin powder made into a paste with some water. Once these dry spices are cooked add in the shredded chicken and add some salt.Stir for 3-4 mins so that the chicken takes on some color and the spices.Now add the cashew paste and stir.Add in the sour cream or the heavy cream.Now add in the sliced eggs.Let the yolks mix into the spices with the stirring.The boiled yolks will become a part of the gravy....that is the specialty of chicken bharta. Now add in the reserved water in which the chicken was boiled.....how much you want to add will depend on how much gravy you want.In the end add the kasuri methi or the ground fenugreek seeds.Serve hot with the butter melting on top.


Thursday, July 11, 2013

Penne Rigate with broccoli and chicken......simple and delicious pasta dish.

This is one of those recipes you fall back on when you want dinner made fast and with few dishes to wash afterwards.I have made this recipe with Angel Hair pasta too but it comes out the best with Penne Rigate. The hollow pipe shape makes sure the creamy sauce sticks on and the pasta tastes better.I like the broccoli in this pasta and can make it sans the chicken.With the chicken you have a complete meal of protein,carbohydrates and the veggies.
I checked the pasta packet and to my surprise, 1/2 cup of the raw pasta was 200 calories.I was under the impression that 1 cup of raw pasta was a single serving....certainly not in this case.I generally do a metal calorie summation when I cook with calorie rich ingredients like cream and cheese.This recipe was going to have cream and 2 types of cheese-both mozzarella and Parmesan. The Parmesan and cream go into the making of the sauce and the mozzarella to create the sticky texture on the top.
I had to re-evaluate and substitute to get the calorie count into a moderate range for this recipe to be a regular dinner on a regular day.With the modified recipe the calorie count will be about 450 calories per serving and it tastes almost as good as the full on calorie version.

Penne Rigate pasta-2 cups dry
Broccoli florets-4 cups
Whole milk-1 cup
Parmesan cheese-1 cup
Chili flakes-1 teaspoon
Chicken-1 breast piece/1 thigh piece cut into 1-2 inch strips
Garlic-1 clove minced
Crushed pepper-1 teaspoon
Salt-to taste
Olive oil-2 tablespoons

Boil your pasta according to the cooking instructions on the packet.Mine said 11 mins.I like my broccoli not too mushy.....8 mins for boiling my broccoli is good.So I added the broccoli to the boiling pasta water after 3 mins of adding the pasta.When done strain them and keep aside.
While your pasta and broccoli is bubbling away,season the chicken strips with pepper and salt.Heat the oil and fry the chicken strips..... in about 4-5 mins it will get a nice light golden color.I think mine were done about 6 minutes...it acquired a little more color.Add in the crushed garlic and give it about 30 sec to release it's flavor.My olive oil is garlic flavored so I did not add the garlic. Add the chili flakes and then add in the milk.When the milk heats up stir in the Parmesan cheese.Stir till it turns into a sauce.Add in the pasta and the broccoli and coat with this cheesy sauce.Adjust seasoning and you have dinner ready for 4 in 20 mins.


Wednesday, July 10, 2013

Lima Beans in a Konkani style curry.

I had no idea what Lima beans were till my Konkani friend brought it in her lunch box.Big "rajma" (kidney beans) like beans only green in color.Took a spoonful from her lunch box and became a big fan of this fresh green bean seed.I asked her to check with her mother how it was prepared.Well..... I asked her first and she said, she only know her part in the preparation and that was getting the seeds out of the beans for her mother to cook.Scary I thought.....who has the time for that in today's world of Frozen Peas,Frozen corn.That was back in Bangalore.Anyways she did give me her mother's recipe which I partly remembered when I chanced upon packets of Lima beans in the Frozen Food section of Hannaford in US.
Here is how I make the Lima beans.It tastes the same like my friend's mother's except for 2 things which usually I  don't have in my Bengali Kitchen-Tamarind and Curry leaves.I substitute the Tamarind with Tomatoes and omit the Curry leaves.

Frozen Lima beans-1 pound packet
Onion-1 medium chopped fine
Tomato-1 medium cubed
Coconut-1 cup
Garlic cloves-3 big
Dried red chili-4
Cumin seeds-1 tablespoon
Cumin powder-1 tablespoon
Corriander powder-1 tablespoon
Turmeric powder-1/2 teaspoon
Salt to taste
Oil-4 tablespoons

First grind the red chili,garlic cloves and the coconut in a grinder/blender to a nice paste.Now in a pressure cooker heat the oil and splutter the cumin seeds.Add the chopped onions and fry for about 3-4 minutes.Add the cubed tomatoes and fry till the oil separates.Now add the ground paste and fry again till oil starts separating.Add the cumin powder,coriander powder, turmeric powder and salt.Give it a few stirs to get the dry spice powder mixed up well.Now add the lima beans and stir till all the beans and the masala mixes together.Now add 4-5 cups of water put the lid on the cooker and cook the beans till 4 whistles.Check the beans when cooked.Press one bean between your fingers,it should melt like butter.If it doesn't you need to cook for a whistle more.

Tuesday, July 9, 2013

Lau er khosha bhala.......Fried bottle gourd peels.

I credit myself with knowing how to buy a "kochi lau"(a bottle gourd which does not have too many seeds).It's something I learnt from my mother.When you are buying bottle gourd you need to choose the shape that is a uniform longish shape.The ones with the little round at the bottom will have more seed.Now poke the bottom end  of your selected gourd with the nail tip of your index finger.If it slides smoothly through the skin,it's good to buy.If the skin is hard your nail tip will not slide smoothly....and that is a gourd which will have more seeds.When my mother and I used to go to the vegetable market,I would try this technique on multiple gourds and then tell my mother which one I thought was the "kochi"est.She would check and give her opinion.It didn't take a long time to get her approval on my selection..... consistently!!!Once you are able to understand the feel that you get when your nail tip slides into a "kochi" bottle gourd's skin.......you will be successful in picking up a fresh gourd every time.After so much of effort to pick up a "kochi" lau....who would like to waste the beautiful peel?..........specially when it tastes so good on it's own.
This post is on how to cut the gourd peels and fry it for a scrumptious side dish to go with plain rice.


You need to peel the gourd a little thick .....so you cannot use a peeler.Use a knife and peel about 1/8th of an inch(approx) skins.I cut the gourd into rounds about 2-3 inches in width and then peel the skin.I can manage it better that ways.Once all the peeling is done,take the peels and run the sharp tip of your knife to create match stick size pieces.

For frying the peels,
Oil-1 tablespoon
Green chili/Dried Red chili-2
Nigella seeds-1 teaspoon
Turmeric-1/2 teaspoon
Salt-to taste

In a pan heat the oil,put in the nigella seeds and the chilies.Allow the nigella seeds to start crackling.Now add all the chopped peels.Stir for sometime and then add the turmeric.Now put the flame on low and cover the pan.It will take 8-10 min for the peels to become soft.Once soft ,take the cover out ,add salt to taste and give it a few more stirs.The more you stir and fry,the peels will become more crispy and ahem tasty.....:-) but you will be missing out on the nutrients.I serve the" lauer khosha bhaja" not too crispy...it retains some moisture in it to mix up with plain rice and eat.The very crispy bhaja I will probably serve with daal.